Page
Harvesting Of Meat
Completion requirements
View
Abattoir which means ("to strike down"), is a facility where farm animals are killed and processed into meat products. It can also be called a slaughterhouse. (Meat, in its broadest modern definition, is all animal tissue intended to be used as food. In this context, it not only refers to muscle tissue, but also includes fat or non-muscle organs, including lungs, livers, tongues, skin, brains, marrow, and kidneys. )
The animals most commonly slaughtered for food are cattle (beef and veal), sheep (lamb and mutton), pigs (pork), poultry, and horses (mostly in Europe).
The design, process, and location of slaughterhouses respond to a variety of concerns. Slaughtering animals on a large scale poses significant logistical problems and public health concerns. Most religions stipulate certain conditions for the slaughter of animals. Public aversion to meatpacking, in many cultures, influences the location and practices of slaughterhouses.
Process
Meat goes through many operations before it hangs dressed in cold stores. Skilled workers perform these operations with great speed. The animals are stunned before they are slaughtered and dressed. After slaughtering the carcases are suspended from an overhead rail for the dressing operation, in which the hide and internal organs are removed.
Further along with the line various trimming procedures are performed. By the time it reaches the end of the chain the carcase is clean, "dressed" and ready for chilling and classification. After slaughtering and dressing, the carcases are inspected by a meat inspector to make sure that it is fit for human consumption.
Diseased carcases are destroyed or sterilised and turned into meat-meal and bone meal, which are used mainly for feeding livestock. In the case of the beef parasite known as "measles", carcases with a very light infestation are frozen at -10°C for ten days. This renders the cysts harmless and the meat fit for human consumption.
At abattoirs that participate in the voluntary classification system, the carcases are classified according to certain characteristics (see "Specifications and Classes). Roller marks, which tell the consumer more about the meat, are put onto the carcases.
After classification, traders buy the carcases. The meat trader then sells it to the consumer in the meat market. The carcases are transported from the abattoir to the meat market by a refrigerator truck. The carcases are hung in large cold rooms at the meat market.
Steps in Slaughtering
The steps in harvesting Halaal and Kosher meat:
- Animals are received by truck or rail from a ranch, farm, or feedlot.
- Animals are herded into holding pens.
- A pre-slaughter animal inspection is conducted.
- Animals are rendered insensible (unconscious - lack of responsiveness to people and other environmental stimuli) by stunning - the process of rendering animals immobile or unconscious prior to their being slaughtered for food (method varies).
- Animals are hung by hind legs on the processing line.
- The main artery is cut, the animal's blood drains out and the animal dies.
- Animal's hide/skin/plumage is removed.
- The carcass is inspected and graded by a government inspector for quality and safety.
- The carcass is cut apart and the body parts are separated.
- Meat cuts are quickly chilled to prevent the growth of micro-organisms and to reduce meat deterioration while the meat awaits distribution.
- The remaining carcass may be further processed to extract any residual traces of meat, usually, termed mechanically recovered meat, which may be used for human or animal consumption.
- Material not destined for human consumption is sent to a rendering plant.
- The wastewater generated by the slaughtering process and the cleaning of the slaughterhouse is treated in a wastewater treatment plant.
- The meat is transported to distribution centres that distribute to local retail markets.
Skinning
When discarding a carcass, you may decide to skin the animal to benefit from the hide (financially or for your own purposes such as clothing and furniture).
There are many ways of skinning a carcass. The carcass may be skinned on a bench or hanging up. There are also various cuts that can be used.
Choosing a technique will depend on the size of the carcass and personal choice but the key element is about creating flaps of skin to pull.
For those who take pride in preparing a well-skinned carcass, the end product should have no hairs on it, no bloody fingerprints, no knife marks, a striped bacon-like appearance on the back and flat joints.
Preparation
The starting point for this guide assumes that the carcass has been gralloched (disembowelled) and ordered (placed ready for processing). In practice, it is easier to skin an animal before rigour Mortis has set in.
Begin by washing down the work area, equipment, hands and forearms.
Skin the carcass as soon as possible.
When skinning the carcass, it may be useful to leave the chest and pelvis closed. The pluck, however, should be removed and inspected beforehand. The head and legs may also be left on to assist in handling the carcass during skinning.
Either hang the carcass by each hind leg on two fixed or anchored hooks or lie the animal on its back on a larder bench.
Work systematically from one side of the animal to the other. It is helpful to have someone hold the legs or tie the legs to the bench.
Cuts
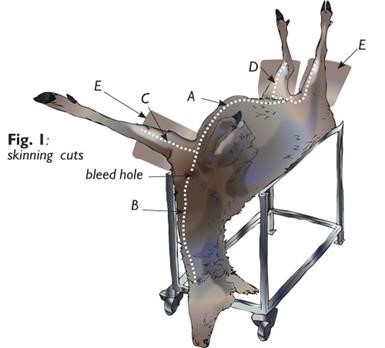
The figures below detail the key cuts to be made. The position of these cuts can vary between practitioners and will depend on whether the carcass is hanging or on a bench. The following suggested technique is based on the carcass being skinned on a bench. If skinning with carcass hanging up, then make cuts accordingly to allow downward tension on flaps of skin.
The key is to minimise the number of cuts and ensure that there are flaps of skin for gripping to assist with skinning.
Keep your hand clean at all times by periodically washing in water. Having a wet hand also helps your hand or fist slide between the skin and the carcass easier.
Use one hand to hold the skin and apply tension to peel away the skin while the other hand can be used to break through the connective tissue between the skin and the carcass.
It is good practice to use the knife to ensure that the skin is being separated from the carcass and not taking a layer of tissue with it.
To prevent hairs from being cut and contaminated by the hair into the skin, make cuts to the skin from inside/underneath the skin outwards (see Fig. 2).
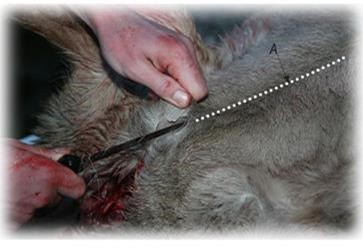
Cut A: Cut through the skin only over the sternum from a bleed hole in the neck up to the breast bone. Make cut over the length of the pelvis. Remove penis or udder.
Cut B: Cut from bleed hole to under the jaw (this may have been partly done during the gralloching process**). Care should be taken around the neck area to limit the amount of blood spilling onto carcasses.
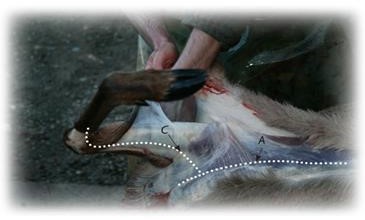
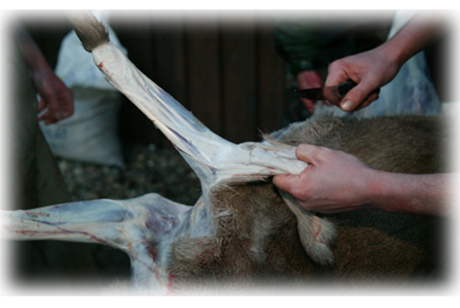
Cut C: Make a cut through skin in a line down the front leg from knee to chest to join up with Cut A creating a flap (see E in Fig. 1). This rectangular flap can be pulled to create tension.
Use a hand or fist to push skin from the carcass around the front leg.
Pushing an arm between the leg and skin can be used to free skin around the leg.
There is an option to cut through skin in a line around the knee. Alternatively cut off leg at flat joint once skinned leaving front leg attached to the skin. This provides a weight that pulls the skin away from the carcass.
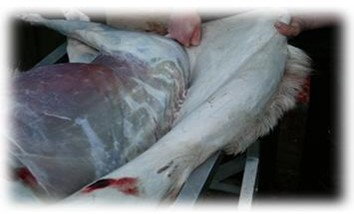
Use your fist to push the skin away from the carcass over the flank. Note a knife may need to be used to help start the separation of the soft tissue around the flank from the belly.
Push the skin away from the carcass working as far back towards the backbone as you can.
Cut D: From cut A make an incision down the leg to the groin/pelvis area.
Use flaps of skin (see E in Fig. 1) to help skin the back leg as with the front leg.
Use a fist to push the skin back towards the backbone.
Repeat the whole procedure on the other side of the carcass.
Hang carcass up. The only area of skin attached should now be the very centre of the animal’s back. If there is any skin left on the back, work skin towards the tail rather than pulling down as the skin may break. Cut through the tail at the anus, leaving attached to the skin.
Pull skin downwards only when over the neck, using steady pressure. Use one hand to hang onto the carcass, and the other to pull the skin down enough to expose the atlas joint.
 |
|
| Figure 1 | |
 |
 |
| Figure 2 | Figure 3 |
 |
 |
| Figure 4 | Figure 5 |
After Skinning
Cut the head off at the atlas joint.
Check the carcass for warbles and remove it.
If the carcass has been skinned with the chest and pelvis closed, consider splitting them at this stage. Remove the anus when the pelvis is split. The benefits of this should be balanced with cutting into the meat and exposing surfaces when there may be no need.
Leave the carcass hanging in the larder initially to enable the carcass to cool slowly and steadily in the first six hours after skinning. This will ensure the full and rapid onset of rigour and will prevent cold shortening of the soft muscles in the carcass. Thereafter carcasses should be stored at 7 ºC or below.
Processing and Presentation
The meat was originally processed to preserve it, but since the various procedures cause so many changes in texture and flavour it is also a means of adding variety to the diet.
Processing also provides scope to mix the less desirable parts of the carcass with lean meat and in addition is a means of extending meat supplies by including other foodstuffs such as cereal in the product.
Meat is a highly perishable product and soon becomes unfit to eat and possibly dangerous to health through microbial growth, chemical change and breakdown by endogenous enzymes.
These processes can be limited by reducing the temperature sufficiently to slow down or inhibit the growth of micro-organisms, by heating to destroy organisms and enzymes (cooking, canning), or by removal of water by drying or osmotic control (binding the water with salt or other substances so that it becomes unavailable to the organisms).
It is also possible to use chemicals to inhibit growth and, very recently, ionising radiation (however, the latter is not allowed in some countries).
Traditional methods that have been used for thousands of years involve drying in wind and sun, salting and smoking. Canning dates from early in the 19th century and allows food to be stored for many years since it is sterilised and protected from recontamination.
Processed meats are products in which the properties of fresh meat have been modified by the use of procedures such as mincing, grinding or chopping, salting and curing, the addition of seasonings and other food materials, and, in many instances heat treatment. Most of these processes extend the shelf life of meat. Their manufacture, in most instances, depends on the ability of the mixture to retain water since they are emulsions of protein, fat and water.
Chilling and Freezing
While mechanical refrigeration is a modern process it is known that the ancient people kept food cool with ice. "Chilled" meat is usually stored at temperatures around 1 °C to +4 °C when it keeps well for several days. Provided that the meat is kept very cool (1°C to 0°C) and that slaughter and meat cutting are carried out under strict hygienic conditions, modern packaging techniques including storage under carbon dioxide or in a vacuum can extend this period to about 10 weeks.
Chilling at temperatures very close to the freezing point of meat, -15 °C, diminishes the dangers of most pathogens and slows the growth of spoilage organisms; growth of some organisms, moulds, virtually ceases at -10 °C.
Most pathogens (Salmonella, Staphylococcus species and Clostridium) are inhibited by cooling but pathogens can grow at + 2 °C and some Salmonella species at +5 °C.
Non-pathogens include Pseudomonas species, which predominate on the exposed surface of chilled meat, and Lactobacilli on vacuum-packed meat.
Freezing - commercially at -29 °C and domestically at -18 °C - is now a standard method of preserving for periods of 1-2 years but there is some deterioration of eating quality compared with fresh or chilled meat.
However, there are problems with chilling and freezing meat. If it is cooled too rapidly below 10 °C before the pH of the muscle has fallen below a value of about 6, the muscle fibres contract (cold shortening) and the meat is tough when cooked.
This problem applies more to small animals, such as lambs, which cool down rapidly. The modern procedure is to cool the carcass to 10 – 15 °C ("conditioning") and to hold that temperature for a few hours until the pH has fallen to 6 °C.
Beef carcasses can be suspended in such a way as to exert a pull-on certain muscles to prevent contraction. Another method is to apply electrical stimulation to the carcass after slaughter (low volt) or after evisceration (high volt) for 2-4 minutes to bring down the pH rapidly.
Another problem can arise during the thawing of pre-rigour frozen meat when the muscle contracts and exudes a substantial part of its weight as tissue fluids Clearly, freezing of meat is not a straightforward procedure and calls for certain expertise. Only post-rigour meat should be frozen.
Meat is frozen without any prior treatment, unlike vegetables, which have to undergo a preliminary blanching process to destroy enzymes involving considerable loss of water-soluble nutrients. So, there is little or no loss of nutrients during neither the freezing procedure nor, so far as there is reliable evidence, during frozen storage - apart from vitamin E.
Curing
Curing was originally a term applied to preservation in general but is now restricted to preservation with salt (sodium chloride) and sodium or potassium nitrite or nitrate or a mixture of these two salts. The nitrate serves as a reservoir for nitrite - the active compound - since bacteria in the curing solution form, from the nitrate. The use of salt is one of the oldest methods of preserving meat since at concentrations greater than 4% in the aqueous phase it inhibits the growth of most spoilage organisms.
Smoking
Meat has been treated with smoke from the earliest days - traditionally over a wood fire and more recently by producing smoke from wood sawdust in a generator and conducting the smoke over the meat.
The substances deposited on the meat contribute to the flavour and appearance but with ordinary, light smoking the preservative effect is limited and the product has to be stored refrigerated.
Intensive smoking does prolong shelf life both by heavier deposition of preservatives and by the drying effect of the hot air, but it has a detrimental effect on flavour. Consequently, preservation by smoking is regarded as an emergency measure when other methods cannot be used.
A modern development making use of the flavouring effect is to use an aqueous solution of the constituents of smoke, which reduces the amount of strongly flavoured and other unwanted substances.
Drying
Micro-organisms cannot grow unless there is sufficient moisture available to them and drying meat under conditions of natural temperatures and humidity with a circulation of air and the assistance of sunshine is the oldest method of preservation. Muscle meat of almost any kind can be dried but it is necessary to use lean meat since fat becomes rancid during the drying process. Drying involves the removal of moisture from the outer layers and the migration of moisture from the inside to the outside, so the pieces of food must be thin. The meat is cut into long thin strips or flat thin pieces and preferably salted, either dry or dipping into salt solution, to inhibit bacterial growth and to protect from insects.
Canning
Micro-organisms can be completely destroyed by heat (sterilisation) but a sterile product can be readily re-contaminated unless it is protected. This is achieved by heating in an airtight can or bottle, or, more recently, in a heat-resistant or aluminium foil-laminated plastic pouch.
The procedure is to seal the food into the container and then heat it under pressure in an autoclave (retort) to the required temperature for the required length of time and to cool rapidly to avoid overheating.
Overheating results in too soft a consistency and a burnt taste. It is not always possible to destroy all the organisms without excessive heat which would spoil the product, so the objective is to destroy the greater proportion of the organisms when the remaining few pose no hazard so long as the container is cooled rapidly and stored below 20 – 25 °C.
Click here to view a video that explains cattle slaughtering.