Page
Castration
Completion requirements
View
Castration is the removal of the testicles from a male animal. Castration may be either immediate (surgical, using a blade) or delayed (non-surgical, using an Elastrator® ring or Burdizzo® emasculator).
New technology, such as male infertility vaccination, may eventually render present castration practices obsolete, with obvious benefits to animal welfare, but it is not yet practical for on-farm use.
Why Castrate?
Compared to entire male cattle, castrated males:
- Are less aggressive.
- Are easier and safer to handle.
- Are less likely to fight, reducing bruising and injuries to themselves and other cattle and damage to fences and gates.
- Are easier to keep in paddocks after the time that sexual maturity would be reached.
- Prevent unwanted mating and allow greater control over genetic gains through selective breeding
When to Castrate
The younger that bull calves are castrated, the better. Early castration significantly reduces:
- Pain and discomfort for the anima.
- Risk of bleeding and infection.
- Recovery time after castration.
- Weight loss after castration.
- The difficulty of restraining the calves and performing the procedure.
- Risks to the operator and the amount of labour needed.
Calves as young as two days old, but no more than two weeks old, can be effectively castrated with Elastrator® rings.
Calves should be castrated preferably under six months of age or at the first muster before weaning (it is acknowledged that in extensive cattle operations the first muster may not occur until calves are more than six months old). In more intensively managed situations, castration may be possible well before six months, and this should be the aim.
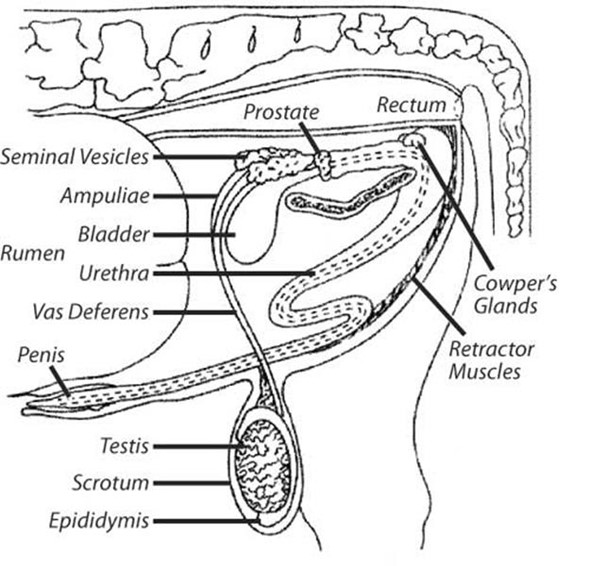
Bull’s Reproductive Anatomy
The important relevant structures in the bull's reproductive anatomy are the scrotum, testicles and spermatic cords – with their associated blood vessels.
Scrotum
- The scrotum is a bag of skin containing the testicles.
- The scrotum is divided into two sections by a membrane called the scrotal septum; each side contains one testicle.
Testicles
- Each testicle is covered by a tough fibrous membrane called the vaginal tunic. This membrane is separated from the testicles and removed during castration to reduce the risk of swelling and infection.
- The epididymis, with a distinct lump on each end (the head and tail of the epididymis), attaches around the curved outer upper and lower surface of the testicle.
Spermatic Cord
- The spermatic cord is attached to the top of the testicle and goes up into the neck of the scrotum. It is enveloped in a fibrous vaginal tunic.
- The spermatic cord contains the duct which carries sperm from the testicle and the major blood vessels supply the testicle. The sperm duct comes out of the epididymis that is attached to the testicle.
Anatomical Abnormalities
Cryptorchidism
Some calves (about five calves in every 1,000) have only one testicle in the scrotum. This is called cryptorchidism (and is heritable).
- The retained testicle does not produce sperm but will produce male sex hormones.
- If a cryptorchid is found, it is advisable not to remove the one testicle present; this would greatly reduce the chances of the other one descending into the scrotum later – when full castration can be performed.
- If the one descended testicle is removed, the animal is known as a ‘stag’ and, though infertile, will exhibit male sexual characteristics (eg mounting and aggression). If this is done, a close watch needs to be kept on the ‘stag’ in case the other testicle does descend, with the possibility of fertile mating occurring.
Inguinal Hernia
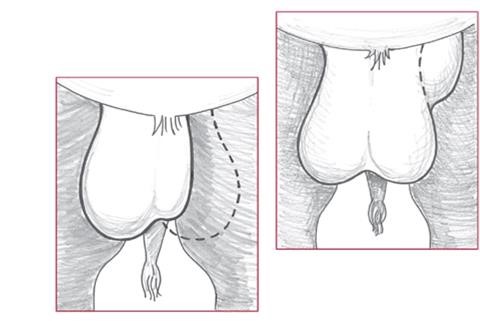
On rare occasions, calves will have a larger than normal opening between the abdominal cavity and the scrotum, allowing intestines and/or fat to descend into the scrotum.
- An inguinal hernia will look like a large swelling on one side of the scrotum, often near the top. This swelling will often feel soft, due to the intestines or abdominal fat descending into the area.
- Do not attempt to castrate a calf if an inguinal hernia is suspected. Consult your veterinarian, or leave the calf entire.
Deformed or Injured Testicles
Injuries to testicles or previous infections can result in deformed testicles and adhesions developing between the testicle and the scrotal wall.
If the testicles do not move easily inside the scrotum, do not attempt to castrate the animal. Consult your veterinarian, or leave the entire.
Effective Restraint of the Calf
Proper restraint is essential for the welfare of both the animal and the operator.
Most calves are castrated in a commercially available calf cradle. A cradle that secures the calf in an elevated position, and does not touch the ground, is easier to use and reduces dirt and dust contamination of castration and dehorning wounds.
If no cradle is available, calves can be:
- Held firmly on their side on the ground by one or more competent operators, depending on calf size, with an additional operator holding the leg.
- Restrained standing in a crush by one or more operators holding the calf firmly against the side of the crush. Holding the tail vertically and slightly forward towards the head of the calf helps restraint. However, this standing position is not recommended as it is generally harder to perform the operation and there is a greater chance of retraction of the testicle into the scrotum or inguinal canal during surgical castration.
Equipment Needed for Surgical Castration
- Separate buckets containing an effective antiseptic (such as Hibitane® or Savlon® mixed to the recommended dilution) for hand washing and then antiseptic rinsing.
- A suitable pair of artery forceps to clamp blood vessels in case of heavy bleeding. This is unlikely if the correct procedure is followed.
- Scalpel blades (no. 10, 22, 23 or 24) and handle.
- A shallow container of antiseptic solution for the scalpel between calves.
- A secure closable sharps container for used blades.
Equipment Needed for Non-surgical Castration
Buckets containing effective antiseptic for hand washing and then antiseptic rinsing either a Burdizzo® emasculator or an Elastrator® applicator and rubber rings. The size of the Burdizzo® used will depend on the size of the calves
Surgical Castration – Using A Blade
- Restrain the calf, preferably in a calf cradle, or on the ground or standing in a crush.
- If the calf is on its side, pull back its upper hind leg fully, hold it firmly to expose the scrotal area
- Check the scrotum to ensure there are two free-moving testicles present and there is no inguinal hernia or other
- If the scrotum is excessively dirty or covered in faeces, clean it with antiseptic before proceeding.
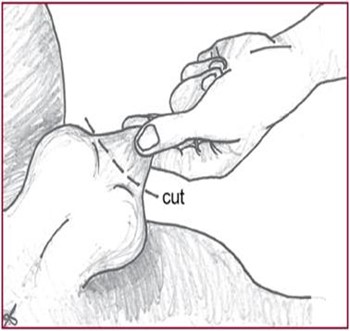
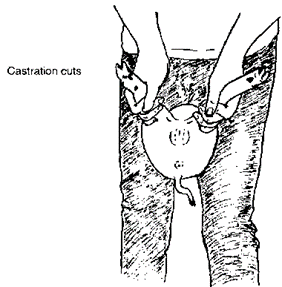
- Always remove the testicle closer to the ground first – this will minimize the contamination of the second incision.
- Squeeze the testicle to trap it against the bottom of the scrotum so the skin of the scrotum is stretched over the testicle.
- Make a firm, decisive incision in the scrotum from about halfway up the scrotum to the midline of the base of the scrotum. The incision size will depend on the size of the testicle. A larger incision is better; a small cut may not allow adequate drainage and could result in a higher incidence of infection.
- The incision invariably cuts a little into the tissue of the testicle. This is not a problem, provided the testicle is not squeezed excessively resulting in the testicular tissue being shelled out. This makes the remnant of the testicle almost impossible to hold, and it can be withdrawn into the scrotum to the point of being irretrievable. This may result in a ‘stag’ (an infertile animal with male sex characteristics).
- Make sure the incision through the scrotal wall and through the vaginal tunic (the thick fibrous capsule or inner bag surrounding the testicle) is long enough to allow the testicle to be easily squeezed through the incision, and to allow good post-operative drainage.
- Pull the testicle from the incision hole by wrapping fingers around the testicle and the spermatic cord.
- Cut through the white fibrous vaginal tunic close to the incision opening, freeing the cut fibrous tissue and testicle with epididymis attached. The blood vessels are then manually separated from the sperm duct and the fibrous tissue. The sperm duct and fibrous tissue are then cut as close to the neck of the scrotum as possible, leaving the testicle attached only by the blood vessels. This fibrous tissue must be removed separately from the blood vessels, so cut through and remove it before removing the testicle.
- Firmly pull the testicle away from the scrotum with the attached blood vessels and remove it with one quick continuous tearing action. This is the best way to prevent excessive bleeding as stretching helps block the blood vessels.
- If the testicle cannot be torn away, it means there is remnant fibrous tissue that has not been completely separated from the blood vessels. This must be separated from the blood vessels before attempting to tear again. Another, but less preferred, the method is to stretch the blood vessels and cut through them by scraping back and forth repeatedly with the scalpel blade close to where they exit from the top of the scrotum. Do not cut straight through the cord as a clean-cut will predispose to excessive bleeding.
- Trim away any obvious loose tissue to minimize infection and promote wound healing.
- Repeat the procedure on the other testicle.
- Do not allow any tissue to return back into the scrotum after it has been pulled out as it is potentially contaminated and a source of infection.
- Pull the scrotum away from the body in one single ‘stripping’ motion to allow the cut ends of the cords to retract high up into the scrotum and to remove any blood clots. This will reduce the chance of post-operative swelling and infection.
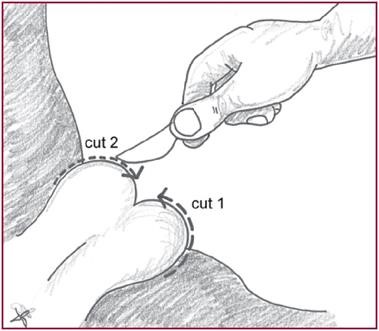
An alternative procedure is especially useful in young calves with smaller testicles that are difficult to grasp through the scrotum. This method is to remove the bottom quarter of the scrotum by grasping it firmly with the thumb and forefinger of one hand, stretching it away from the body of the calf, and removing it with one quick, clean incision. Each testicle is then easily exposed, freed of the fibrous vaginal tunic and removed as described above.
 |
 |
Doing Surgical Castration – Using a Blade
| Start with the testicle closest to the ground. | |
| Squeeze the testicle against the bottom of the scrotum to stretch the skin. | |
| Cut from about halfway up the side of the scrotum to the midline of the base of the scrotum to allow the testicle to be easily squeezed out. | 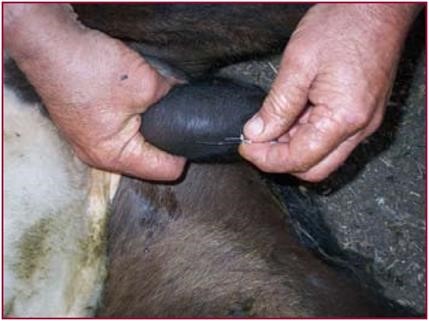 |
| Pull the testicle from the incision hole by wrapping fingers around the testicle and the spermatic cord. | 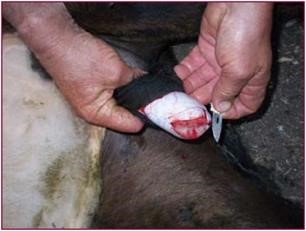 |
| Separate the blood vessels from the sperm duct and the fibrous tissue. | 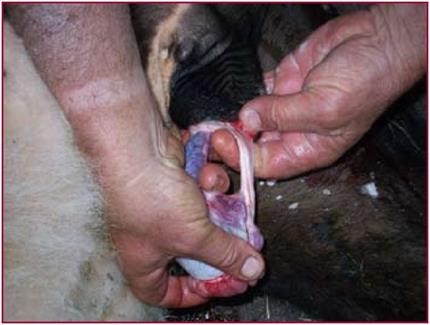 |
| Cut through the white fibrous vaginal tunic close to the incision opening, freeing the cut fibrous tissue from the testicle with epididymis attached. | |
| Cut the sperm duct and fibrous tissue as close to the neck of the scrotum as possible, leaving the testicle attached only by the blood vessels. (This fibrous tissue must be removed separately to the blood vessels, so cut through and remove it before removing the testicle.) | |
| Firmly pull the testicle away from the scrotum and remove it with one quick continuous tearing action. (Don't cut straight through the cord or it will bleed excessively; stretching helps block the blood vessels.) | |
| Pull the scrotum away from the body in one single ‘stripping’ motion to allow the cut ends of the cords to retract high up into the scrotum and to remove any blood clots. This reduces any post-operative swelling or infection. |  |
Hygiene
- Before starting, and between animals, immerse instruments constantly in a solution of an effective antiseptic (eg Hibitane® or Savlon® mixed to the correct dilution).
- Wash both hands thoroughly first and then rinse in an effective antiseptic solution before each calf’s castration, especially if performing other procedures (such as dehorning). Use separate buckets for initial washing and then antiseptic rinsing to prevent excessive contamination of the antiseptic solution.
- Change all antiseptic solutions (for hands and instrument storage) every 15–20 calves to stop them from becoming contaminated.
Possible Complications of Surgical Castration
The risk of complications and infections is greatly reduced by castrating calves when very young.
Swelling: The risk of swelling and fluid build-up is reduced if a large incision is made initially through the skin and underlying fibrous tunic tissue.
Infection: The infection will show as a swollen reddened area, with or without pus discharge. Infected wounds should be treated by drainage and/or antibiotics, by or under the direction of a veterinarian.
Bleeding: Minimal bleeding occurs if the cord is stretched as described. If there is excessive bleeding, the vessel should be located and clamped with artery forceps; otherwise, apply firm pressure over the scrotum to control the bleeding.
Fly Strike: Flystrike may occur, particularly if castration is done in rainy or humid weather. To avoid these conditions and check cattle frequently, preferably daily, for 10 days.
Non-surgical Castration with Elastrator Ring
A small rubber ring is placed around the neck of the scrotum to cut off the blood supply to the scrotum and testicles. All tissue below the ring will die and fall off.
Castration with Elastrator® rings should be done only to calves less than two weeks old.
Using rings on older calves causes a high incidence of swelling and infection, and severe pain in the calf. This is because there is too much tissue in the neck of the scrotum for the ring to completely block the blood flow both into and out of the scrotum. Some blood can still flow in but none flows out.
Castration of very young calves (less than two weeks old) with Elastrator® rings is very effective and appears to cause little discomfort to the calf compared to other methods of castration. Calves can be castrated with rings when two days old and they can be easily restrained in the paddock. Often only one person is needed for the whole procedure in very young calves, but the operator should be wary of the calf’s mother as she may become aggressive when her calf is handled.
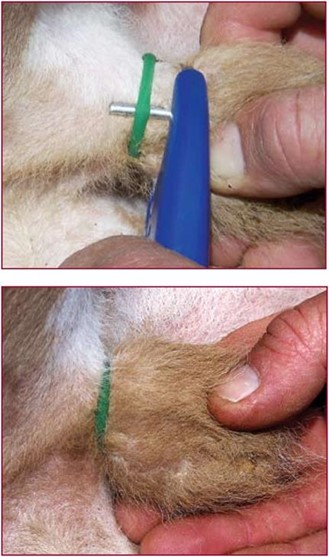
Castrating With a Rubber Ring
- Restrain the calf on its side.
- Place the rubber ring on the Elastrator® applicator and expand it.
- Position the applicator near the bottom of the scrotum with the prongs pointing towards the calf’s body.
- Pull the tip of the scrotum through the expanded ring which is positioned above the testicles close to the calf’s body.
- Apply gentle pressure at the neck of the scrotum to force the testicles below the rubber ring into the scrotum. Do not place the ring too high up the neck of the scrotum as this may pinch the adjacent skin on the abdomen.
- Release the pressure on the applicator so that the ring tightens around the neck of the scrotum.
- Carefully remove the rubber ring from the prongs of the applicator.
- Palpate the scrotum gently to make sure both testicles are present below the rubber ring.
- Do not use Elastrator® rings unless both testicles are present in the scrotum; thus they should not be used on cryptorchids.
Using the Elastrator Ring
| Place the rubber ring on the Elastrator® applicator and expand it. Position the applicator near the bottom of the scrotum with the prongs pointing towards the calf’s body. | 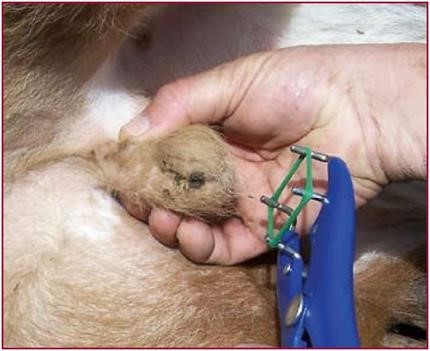 |
| Pull the tip of the scrotum through the expanded ring which is positioned above the testicles close to the calf’s body. | |
| Apply gentle pressure at the neck of the scrotum to force the testicles below the rubber ring into the scrotum. Do not place the ring too high up the neck of the scrotum as this may pinch the adjacent skin on the abdomen. | |
| Release the pressure on the applicator so that the ring tightens around the neck of the scrotum. | |
|
Carefully remove the rubber ring from the prongs of the applicator. Palpate the scrotum gently to make sure both testicles are present below the rubber ring. |
 |
Non-Surgical Castration – With A Burdizzo®
 |
 |
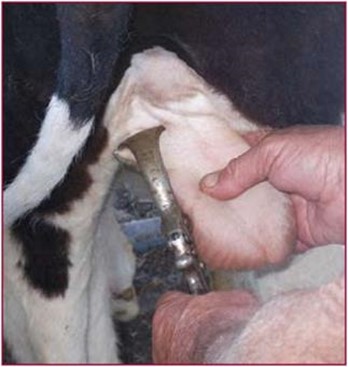
The Burdizzo® is a precision instrument that is used to clamp and crush the spermatic cord and associated blood vessels – without cutting the skin of the scrotum. Without a blood supply, the testicles wither inside the scrotum and disappear over 4–6 weeks, leaving the scrotum intact. Skill and experience are needed to ensure the spermatic cords are properly crushed. The Burdizzo® must be in good condition to work effectively as it can become ‘sprung’ (a properly working Burdizzo® should completely sever a match stick placed between two sheets of paper without cutting the paper).
- The procedure is best done from behind with the calf standing.
- The calf must be well restrained and the handler protected from being kicked.
- Palpate the left spermatic cord at the neck of the scrotum and move it to the outer edge of the scrotum.
- Clamp the Burdizzo® tightly over the cord, ensuring only that part of the scrotal skin covering the cord is included. Be careful in case the calf kicks.
Note: The skin down the midline of the scrotum must not be crushed so that blood flow to the scrotum is not interfered with – reduction of blood flow may cause infection and deformity of the scrotum.
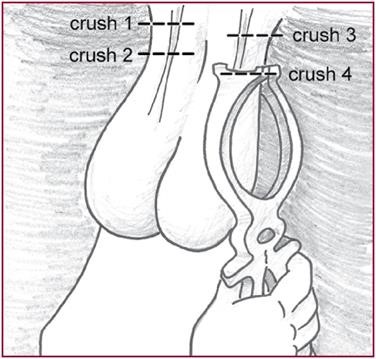
- Leave the clamp in place for 10–20 seconds.
- Open the clamp and reapply about 1cm below the original application point. Clamping twice ensures the blood vessels are effectively crushed and completely removes the nerve supply, reducing pain.
- Repeat the procedure on the right spermatic cord, again clamping it twice. Always ensure that the clamping marks of the left and right sides are not joined so as to be certain that the blood supply to the scrotum remains intact.
Using the Burdizzo®
- Restrain calf (standing position is best).
- Feel for the left spermatic cord at the neck of the scrotum and move it to the outer edge.
- Clamp the Burdizzo® tightly over the left cord for 10–20 seconds. Do not crush the midline of the scrotum with its blood flow.
- Reapply clamp about 1cm below the first point – again for 10–20 seconds.
- Repeat double clamping on the right cord (again avoiding the midline blood supply).
The advantages of castrating with the Burdizzo® are that it appears to cause less pain and stress than other methods. There is also little risk of infection because there is no open wound.
The disadvantages are that it is a specialist instrument and it needs a skilled experienced operator to ensure that the cords are completely severed – failures are common if the Burdizzo® is not applied correctly. This can result in partial castration with resultant uncontrolled mating and often causes scrotal deformity with a decreased market value of the steer/stag.
Non-Surgical Castration – By Tension Banding
Like Elastrator® rings, it relies on completely cutting the blood flow in and out of the scrotum, resulting in all tissue below the band dying and eventually falling off. This is done by placing a tension band well up the neck of the scrotum.
The use of tension banding is a complicated and difficult procedure; failure to completely block the blood flow will result in extremely painful and potentially fatal swelling of the scrotum. For this reason, it is not advocated here.
- Castrating younger animals greatly reduces the chance of complications.
- Inspect animals regularly, preferably daily, for up to 10 days after castration to quickly detect any complications.
- If the scrotum is swollen and reddened, consult your veterinarian. Treatment usually involves draining the scrotum by incising the lower part of the scrotum, flushing the wound and administration of antibiotics, especially if there is any sign of pus.
After Care
- Do not apply a dressing powder after castration as it will retain moisture and make the wound attractive to flies.
- The main risk with surgical castration is the retention of too much fluid in the scrotum causing a reddened swollen area. Though some swelling is normal, too much swelling causes discomfort, and the inflamed tissue and fluid accumulation increases the risk of infection.
- Excess swelling nearly always results from not making the surgical incision long enough, and not near the bottom of the scrotum. This allows fluid to accumulate in the scrotum rather than draining out of the wound.
Comparison
|
Method |
Advantages |
Disadvantages |
|
Surgical Castration |
Visual certainty that the task is complete Scalpel blades are sharp, disposable and inexpensive Development of ‘cod’ (fat-filled scrotal sac) enhances appearance and market price |
Blood loss Risk of swelling and infection from an open wound Higher workplace safety risk because of sharp blades Needs experienced operator |
|
Elastrator® Rings |
Calves can be done very young (less than two weeks) reducing stress Bloodless and no open wound Rings and applicator are inexpensive |
Highest tetanus risk Cannot be used on calves older than two weeks No ‘cod’ forms |
|
Burdizzo® |
Older calves (up to six months) can be done with reduced stress Bloodless and no open wound Appears to cause less pain than surgical castration |
Needs experienced operator and good equipment Burdizzo® emasculator is expensive cannot visually confirm if the procedure has been successful |
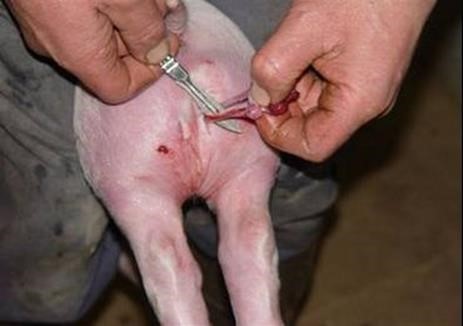
Castration Of Pigs
Male pigs (boars) can fight causing injury to one another. Castrated pigs are quieter and easier to handle. Castrating the pig makes it put on more fat and the meat does not have a strong piggy smell. Young pigs should be castrated at 2 to 3 weeks of age.
Restraining the Pig for Castration
You will need someone to hold the piglet for castration. The pig should be held by the hind legs with its head down and its body should be firmly held between the handler's knees.
Castrating the Pig
- You will need a very sharp, clean knife, scalpel or razor blade. Remove the sow from the litter and if possible put her where she cannot see or hear them.
- Clean the scrotum with warm water and soap and dry it.
- Move the testicle into the scrotum with your finger and then firmly grip the scrotum below the testicle between your thumb and index finger.
- Make a cut 1 - 2 cm long in the bottom of the scrotum. The testicle should pop out through the cut.
- Pull the testicle out of the scrotum and cut through the white cord leaving the red blood vessel uncut.
- Pull the testicle out slightly further and twist it around several times before cutting the twisted blood vessel by scraping it up and down with the knife. This helps to reduce bleeding. Do not pull to break the vessel.
- Do not put your fingers in the scrotum. Apply either tincture of iodine, gentian violet, Dettol or an antibiotic powder (see R5 Annex 1) or a sulpha powder to the castration wound. Remove the second testicle in the same way.
- Put the piglets and their mother on clean bedding. Watch piglets for signs of infection in the wound for the next week. Infected castration wounds swell; piglets do not want to walk or are lame.
Click here to view a video that explains lamb castration.
Click here to view a video that explains bull castration.
Click here to view a video that explains pig castration.