Page
Ensure Animal Product Quality
Completion requirements
View
To be able to implement and maintain a quality control system in an animal production unit or a processing unit requires an intimate knowledge of the various steps of the process through which the product is produced or manufactured. Without knowledge of every step in the production process, it will be impossible to identify where risks to quality may occur or how those risks can be prevented or reduced.
Knowledge of Animal Harvesting
The following section demonstrates the knowledge regarding the correct flaying of a carcass:
The factors which determine the suitability of a tanned hide or skin do not start with the curing process, but with the removal of the hide or skin from the carcass. Once it has been removed from the carcass, the handling it receives immediately thereafter is of vital importance for the retention of quality. The final shape of the hide or skin is more important than most people realise. The value of the processed hide or skin depends on the way in which the cutting lines are made on the carcass.
The preparation begins with flaying or the removal of the hide or skin from the animal after slaughtering, followed by curing of the hide or skin by the addition of salt to dry and preserve the material until it can be processed further into leather. By carefully following the various preparation steps the value of the leather can be conserved. The correct preparation steps are discussed below.
Slaughtering and Flaying
Slaughtering should be done early in the morning or late in the afternoon when the temperature is low, and the air is cool to prevent bacterial growth on the hide or skin. It is also important to bleed the animal well after slaughter, otherwise, the blood stays behind in the skin and the blood veins will show in the grain surface of the leather. This can also happen when dead or very old animals are slaughtered. Poor handling of carcasses after slaughtering can also damage the skin.
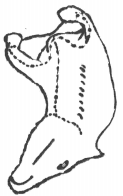
Ripping Lines
These are the cutting lines along which the skin is to be removed from the carcass. When the wrong lines are used, the value of the skin is reduced. The right ripping lines are shown in the figure to the right.
Hints on Removing the Skin
Blood should be drained from the carcass taking care that the minimum amount of blood contaminates the skin or meets the hide or the skin. This will discourage bacterial spoilage. Use a sharp flaying knife with a rounded blade to avoid bad flay cuts on the hide or skin. Do not use the flaying knife where it is possible to simply pull the skin from the carcass. However, pulling too hard will result in “butchers strain” marks on the leather.
 .
.
Remove the hide or skin from the animal immediately after slaughter and allow the hide or skin to cool off in a clean place out of the sun and off the ground to prevent bacterial contamination. Blood and dirt on hides and skins can be washed off with clean cold water.
Curing
The aim of curing hides and skins is to make them resistant to bacterial attacks. They can then be transported or stored until the tanner is able to process them. There are three methods commonly used for salt curing hides or skins, which are as follows.
Wet- salting: Cover the flesh side of the hide or skin with salt and stack the skins in a pile. The salt takes up the water inside the hide or skin and draws off a mixture of blood and water. Most bacteria will not increase in numbers in very salty water.
Dry salting: The salted hide or skin is hung in the shade to dry or dried in hot air in tunnels where the climate is wet. Dry salting is usually carried out in places where salt can be bought, but storage and transporting of wet salted hides is difficult. The method of application is the same as for wet salting. After the minimum treatment period of 48 hrs where the hides or skin have been in contact with the salt, the loose salt is shaken off and the hides or skins are then dried by hanging symmetrically along the line of the backbone over horizontal poles with diameters not less than 7cm. The hides or skins are placed initially with the flesh side uppermost on the poles for drying and then turned over with the hair side uppermost to complete the drying on the wool/hair side.

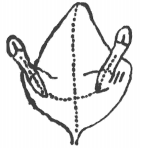
Air-drying: If it is difficult to get salt for curing, the skins can be dried by air, but only in dry climates. The skins should be dried in the shade, with sufficient air movement otherwise the outside of the skin will dry too fast, leaving the inside wet and the skin will rot on the inside. They can be hung over poles as described for dry salting or the skins can be stretched with strings from all sides in the frame to let the skin dry uniformly, as shown in the figure to the right.
Factors to be Kept in Mind During the Removal of Hides
- Hygienic, clean conditions will help to maintain the quality of the hides, skins and wool.
- Contact between the meat and the hide or skin must be prevented at all costs.
- Use a flaying knife, and handle it with care because hides and skins can be badly damaged by cuts and flaying marks, and this lowers their value.
- The hide or skin must be removed from the carcass immediately after slaughter while it is still warm, as this makes its removal easier.
- As little blood as possible should meet the hide or skin.
- Do not sacrifice the value of the hide or skin for the sake of the carcass. If correct flaying methods are used, neither needs to be damaged.
- Do not use a flaying knife if it is possible to pull the hide or skin off the carcass, especially in the case of sheep where the skin can be eased off by hand.
- All cuts to the hide or skin must be made from the inside to the outside to prevent contamination.
- Contamination of the carcass because of dirty hands, hooks, rollers and protective clothing must be prevented.
- To prevent contamination, lactating udders must be cut off as soon as possible and placed in a container.