Page
Marking
Completion requirements
View
Beef Cattle: Legal Identification Marks
Animal identification methods could be classified according to the nature of the characters used (natural or artificial) and the permanence of the character of the animal (permanent or temporary).
Natural characters (e.g. coat colour, horns, hair curls, fingerprinting) are generally used for animal recognition, while artificial characters (marks) are made by humans for different purposes.
Permanent marks (indelible), are applied as signs of individual identification, ownership or protection (e.g. animals in quarantine); and, temporary marks (e.g. erasable or removable) are useful for animal management.
The main reasons for using an animal identification system in the modern livestock industry are:
- To indicate property ownership, for which registered brand or marks is used. Permanent marks are the only identification system acceptable by law as legal proof of identity and ownership.
- To identify individual animals, as a prerequisite for individual performance recording in improved breeding and management systems.
- For disease and residue traced back to the property of origin. Permanent marks are again the only acceptable identification system for this purpose.
All livestock owners must have a registered identification mark for their animals. The permanent marking of cattle, sheep, goats and pigs is compulsory in South Africa.
All owners of livestock have the chance to get a registered Identification mark. The identification mark shows to whom the animal belongs. A legal identification mark is very useful: if lost or stolen animals are found, it will be possible to find the owner.
How to Register an Identification Mark
- Fill in an application form.
- Get the form from extension officers, magistrates’ offices, stock-theft units of the South African Police Services or from the Registrar of Livestock Identification in Pretoria.
- There is an application fee to be paid. You only have to pay once.
- Get a postal order at the post office for the correct amount and mail it together with the application form.
- Address the envelope to The Registrar of Livestock Identification, Private Bag X138, Pretoria 0001, or take the form to the Delpen Building, on the corner of Annie Botha Avenue and Union Street, Riviera, Pretoria.
Rules for Registering an Identification Mark
- All identification marks must be registered. This means that your mark is put on an official list and no one else may use it.
- You may not put an identification mark on your animals if you have not registered the identification mark.
- You may use the same mark for your small and large stock.
- No one may brand your animals without your permission.
- If you buy animals or get them as a gift you must put an identification mark on them within 2 weeks.
- Animals which you sell should have your identification mark.
Identification Marks
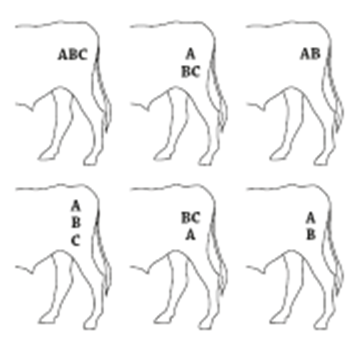
- An identification mark consists of not more than 3 letters of the alphabet or symbols (characters).
- A three-letter mark can be used in 4 different ways (look at the picture).
- Two-letter marks can be used in 2 different ways (look at the picture).
- The characters may not touch one another.
- The same mark may be used on cattle or small stock.
- Mark your cattle with a hot iron or by freeze branding.
- A character of an identification mark on cattle may not be smaller than 40 mm or bigger than 100 mm (high or wide).
- The mark may have 1, 2 or 3 characters.
- The characters may not be closer than 12,5 or further apart than 19 mm from each other.
- You may put the characters next to each other, below each other or in the form of a triangle, or an upside-down triangle.
Where to put the Identification Mark
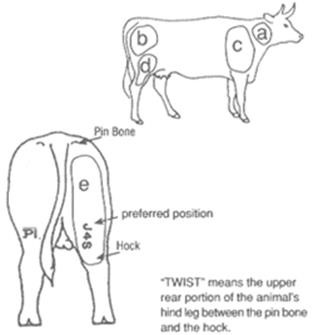
- Put the identification mark as low as possible on the body but where it can be seen easily.
- Do not put the mark on the feet.
- Look at the picture. Put the brand in any place outside the square.
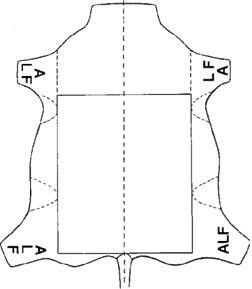
- You can put the mark on the left hind leg, the left shoulder, the right hind leg and on the right shoulder.
- Remember, you can lose money on hides if you mark in the valuable areas.
Ways to Identify Animals
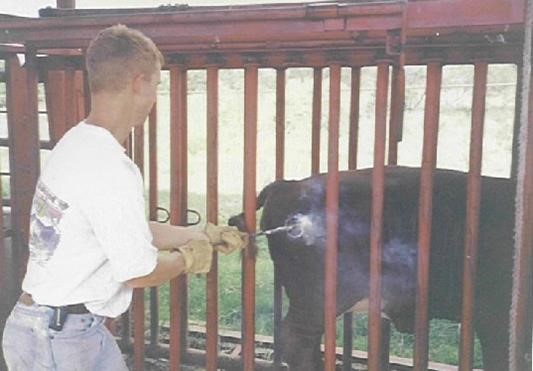
Permanent identification marks can be put on animals by means of hot iron branding, freeze branding or tattooing.
Hot Iron Branding: The stock owner burns a mark on the skin of his animals with a hot iron. You should not brand calves less than 6 months of age.
Freeze Branding: A brand mark can also be put on the animals by way of freeze branding. Freeze branding is done by means of dry ice and alcohol.
Tattoo Mark: Tattoo tongs and ink are used to mark the animals.
Marking With a Hot Iron
The iron application should be performed when the iron is hot-white or ash-grey coloured and not exert excessive pressure, allowing the iron to do the branding.
Recommended procedure (Hurst and Irwin, 2000) is to put the iron against the animal’s skin for 5-6 s (3 counts), without pressure, and roll the iron with the shape of the animal’s body to apply the same pressure at all points of iron contact.
Long application, overheating, rough use or damage to the branding surface of the iron will cause incorrect brands. Thereafter, cold water or wound oil should be sprayed on the mark to reduce burning effects and to improve healing.
For long-coated cattle, the branding area should first be clipped.
The adequate method of heating the irons is a fire of wood or bark burned to coals. Gas burners for heating brands are easily portable and more convenient than traditional wood fires. Coal or coke must never be used, as they burn at too hot a temperature. Electrically heated branders are also available in the market. The correct heat for branding is a blue flame that will instantly burn a piece of paper or board. If the heated iron shows any red, it is too hot. When branding is finished, the hot irons should be cleaned and submerged in sump oil to cool and protect from oxidation.
Fire branding should never be performed in rainy weather, or on hides that are wet because the hot iron boils any moisture in the coat and scalds the surrounding area. Unnecessary pain to the animal and no regular shape brands will be caused in these conditions.
Steps to Follow
|
Step 1 |
Use a separate iron for each character of the mark. It is easier. |
|
Step 2 |
Get everything ready before you start marking. |
|
Step 3 |
Get someone to help you. The helper must bring the animal closer and hold it firmly. If you have a crush pen, branding will be easier. |
|
Step 4 |
Heat the iron well. When the iron becomes whitish it is hot enough. You may test the iron on a piece of wood to see if it is hot enough. |
|
Step 5 |
Knee-halter the animals so that they do not kick you. |
|
Step 6 |
Take the first iron and put it against the animal’s skin for 3 counts. Do not press. Count 1, 2, 3 slowly. Take off the iron. Take the second iron and do the same. The same with the third. Now the mark is complete.
|
|
Step 7 |
Spray some cold water onto the brand so that the animal’s skin can cool down. You can also spray wound oil on the mark. Do not wipe it with a cloth and never rub manure on the mark. |
Marking With a Freeze Branding Iron
A freeze brand may replace an iron brand in dark-coated animals, as initially used in dairy cows and most recently also in horses and mules.
Advantages of freeze branding, when compared to hot-iron branding, are less discomfort and reaction from the animal. Freeze branding is less damaging for hiding than fire branding if the application period is adequate, and no weakness occurs in the leather.
The disadvantages of freeze branding are that it is more expensive and time-consuming than fire branding, the final brand takes up to 4 months and the technique is less suited to light-coloured stock. Moreover, freeze brands may be temporarily tinted for fraud. Nevertheless, freeze branding is accepted as a reasonable identification method in most cases.
The main effect of freeze branding is to destroy the cells that produce the pigment in the skin and hair (melanocytes). After the skin is exposed to the chilled branding iron, it is frozen in the shape of the brand applied and within 2 - 3 min the skin thaws and the area reddens. Marked edema with fluid-filled swelling develops 5 -10 min after brand application, and persists for approximately one day, depending on the exposure time. The edema then recedes, and the branded area becomes dry and scurfy. Varying amounts of skin and hair are lost over the next 2-3 weeks.
Overexposure to the freeze brand may result in excessive hair follicle loss in the centre of the brand, and consequently, the growth of white hair will occur only on the edges of the brand site. Subsequent hair growth occurs usually 6-10 weeks after branding, depending on the season. Freeze branding produces a permanent mark on the skin, the hair re-growing in a lighter colour and the skin itself lacking in pigments.
The resulting brand, if adequate, is legible from about 30 m. In the case of white and grey horses, a bald area is frequently observed after freeze branding.
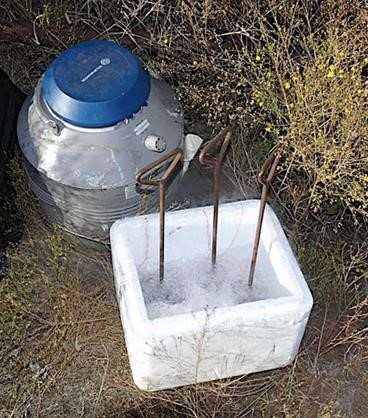
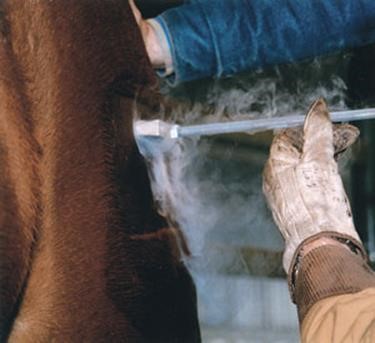
Although liquid N was used initially, it is expensive and more care is needed by the operator. The temperature of liquid N is lower, and the application timing is much more critical in order to avoid over freezing the brand. Moreover, it can only be transported in a suitable thermos with vented tops. Dry-ice made directly from a CO² cylinder or dry ice-methyl alcohol mixtures are more currently used than liquid N. For application, clipping the brand site as close to the skin as possible and removing loose hair and dirt, which increases time and preparation requirements, is recommended. Soaking the brand site with methylated spirits immediately before applying the brand, and repeating for each character improve the brand.
The brand's moulds are cold enough when bubbling (boiling) stops and applied on the hide for approximately 15 - 40 seconds depending on the freezing solution and age of the animal. Restraint of the animal is essential. Animals in poor condition do not brand as well as those in moderate to good condition. The branding of calves (under 4 months) is not recommended.
Freeze branding irons should be made of copper or bronze alloy. Solid copper is the best but it is the most expensive. Conventional steel irons work but are more likely to result in a poor unreadable brand. The face of the irons should be rounded to uniformly transfer the cold from the iron to the skin. Suggested dimensions for the branding face are 6-10 mm wide, 70-100 mm high and 38-50 mm deep. Handles should be about 380 mm long. Approximately 7 kg CO² will produce enough dry ice to fill approximately 100 digit moulds. A mixture of 5 kg dry-ice to 9 l of methylated alcohol is enough for 150 animals to be branded with three characters each.
Equipment Needed
- Coolant – dry ice in ethyl, methyl or isopropyl alcohol and liquid nitrogen.
- Isolated container for the coolant.
- Set of copper or high-quality bronze alloy branding irons.
- Set of clippers.
- 95 % ethyl or methyl alcohol.
- Gloves.
Freeze Branding Process
|
Step |
Action |
|
1 |
Get everything ready before you start branding. |
|
2 |
Get someone to help you. The helper must bring the animal closer and hold it firmly. If you have a crush pen, branding will be easier. |
|
3 |
Knee-halter the animals so that they do not kick you. |
|
4 |
Shave off the hair on the spot to be branded. |
|
5 |
Freeze the irons by putting them in liquid nitrogen or in spirits which have been chilled to –40 °C by means of dry ice. |
|
6 |
When the irons stop giving off bubbles they are cold enough to brand letters onto the skin. Shake off the nitrogen or spirits, otherwise, the flow-off will also leave a mark on the skin. |
|
7 |
Press hard for the following exposure times:
|
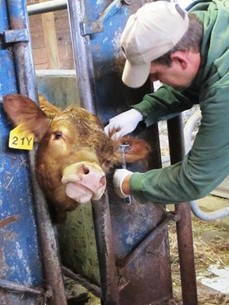
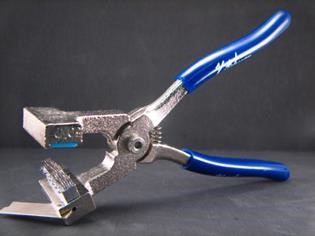
Marking By Means Of Tattooing
Ear tattooing is one of the best conventional methods of permanently identifying animals. The number code that is applied will be in most cases permanent throughout the animal’s life. Tattoos are usually applied on either the left or right ears (all species), lip (horses), groin (pets) and under the tail (sheep and goat). Since the tattoo can only be read when the animal’s head is restrained, it should be used in conjunction with another system which allows the animal to be identified in the paddock.

Black dye paste is normally used for tattoos, but green dyes are preferred with dark or black-eared breeds. The use of a backlight may also help to read tattoos in animals with dark skin.
Tattooing should be done with restrained animals in a skin area which is free of hair, cartilaginous ridges and large veins. Tattoos in the top half of the ear retain their clarity better than those in the bottom half. Although the ear is the most commonplace for tattoos, horses were widely tattooed on the lower lip in the army and in many purebreds.
For dairy sheep and goats, the base of the tail was also commonly used. In both cases, it is recommendable to tattoo the numbers down for easy reading.
Tattooing hammers with big numbers were also used for tattooing the holding numbers in pig expedition, although this practice is not recommended currently because it increases pig stress at transportation to slaughtering.
For better tattooing, the skin should be cleaned and wax in excess removed by using alcohol. After cleaning and applying the dying paste on the area to be tattooed, the tattooing pliers should be applied firmly and quickly, making sure the digits are the right way up for reading. Thereafter, the tattooing paste should be rubbed strongly into the punctures.
Brass digit plates with nickel-plated steel needles punch out clean and clear tattoos. Commercially available digits for tattooing range between 5 and 20 mm high. The minimum ear tattoo size for lambs, kids and piglets are 10 mm; for calves, sheep, goats and pigs is 15 mm, and larger numerals should be used for adult cattle. Two sets of numerals are necessary if both young and adults are to be tattooed on a farm. Rotary 4-chain tattoo devices are also available for marking a large number of animals. Carefully disinfection of the tattooing digits is recommended to avoid infections and disease transmission. Moreover, frequent ear tissue necrosis or fly worm attacks are described after ear tattooing in subtropical conditions.
Tattooing Process
|
Step 1 |
Get everything ready before you start tattooing. |
|
Step 2 |
Get someone to help you. The helper must put the animal down and hold it firmly. |
|
Step 3 |
Put the characters in the right order and position in the tattoo tongs. |
|
Step 4 |
Apply the tattoo ink on the area to be branded (ears or oxters). |
|
Step 5 |
Press the tongs until little holes on the skin appear.
|
|
Step 6 |
Rub the ink into the holes. |
Paint Branding
Sheep branding is usually done by painting the wool after shearing with the symbol of the owner or with digit moulds similar to those used for freeze branding. As this mark is temporary, a second system (ear notching, tattooing, ear tags, etc.) needs to be used for a permanent indication of ownership. Paint is also used for short term marking of other livestock species (cattle, pigs). With this aim sprays of biocompatible paints and wax coloured sticks are used.
Life of paint branding is long in fine wool sheep breeds, but it is short and unsatisfactory in coarse wool breeds. The same problem is observed in hairy lambs.
Paint must be washable to avoid wool depreciation. The colours commercially available are usually yellow, blue, green, black, red, or purple. Brands are usually painted for the side, hip, nose, or jaw on either the left or right side of sheep. No owner brand should be recorded across the back of a sheep, which is normally reserved for individual sheep numbers in most countries.
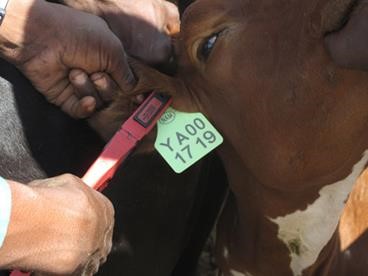
Ear Tagging (Identification)
Ear tags are currently the most common method of identifying individual animals in practice. They can be done in a great variety of shapes (flag, button, loop, etc…), materials (metal and plastic), sizes and colours.
Only tamper-proof and non-reusable ear tags should be considered as a permanent means of identification. Ear tags are easier to read if numbered with the same numbers on both sides, which is recommended for practice.
The retention rate of ear tags is extremely variable ranging from 60-to 98% depending on tag features, species, breeds and environmental conditions.
Animal welfare in regard to ear tags is also questioned in some breeds and conditions. Resistance to environmental conditions and biocompatibility are critical features for choosing the materials used in ear tags. The placement site is specific for each type of tag and critical for its permanency on the animal.
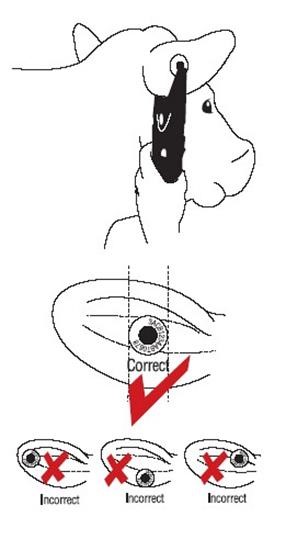
Moreover, environmental conditions affect the infection rate of newly applied ear tags, and no ear tagging is recommended with very hot temperatures or during fly activity season. It is advisable to perforate the ear one or two weeks before application in order to reduce the risk of infection of the tagging site. Dipping tags in an antiseptic solution before the application is a controversial practice but it is thought that it helps to improve retention and to reduce the risk of infection of ear tags.
Metal loop ear tags are made in brass or aluminium. Brass ear tags with tamperproof closing systems have been commonly used for cattle tuberculosis and brucellosis control in many countries. Small aluminium loop tags are easy to stamp and apply, but also easier to remove. Both metal era tags should be placed on the top of the ear, with an overhang of 5-8 mm, and within the inner half of the ear. Placing the tag in the inner portion of the ear means that they are less likely to be torn out.
|
|
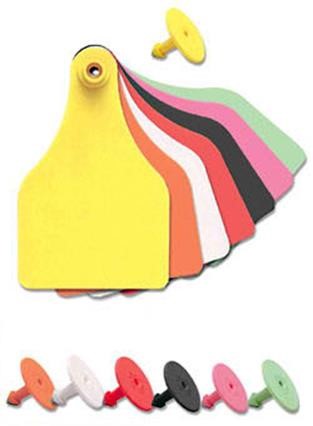 |
Plastic ear tags are currently the most common method of identifying individual animals in many countries, and when they are well designed and adapted for the animal species and breed, they are a recommendable option for livestock identification. They are ideal as a management tool but only tamper-proof and no reusable ear tags should be considered for permanent identification.
With developments in the plastic industry, plastic ear tags have improved considerably, with free-swinging, soft, self-piercing multi-coloured types available. Among the different variety of shapes, sizes and colours available, only soft polyurethane ear tags are currently recommendable for greater retention on the animal. Improved metal or hard plastic points for the ear tag pins are also recommended. Plastic ear tags are available pre-numbered or plain. Specific numbers can be mechanically recorded or handwritten on plain tags by using special markers.
Ear Notching (Identification)
Ear notching is worldwide used for holding identification and in some cases as a cheap system for numbering. Moreover, tuberculosis positive cattle were marked in the past with a T notch in the ear to identify animals to be slaughtered. Ear wound necrosis and breakage, as well as the development of fly worms on the wounds, may alter the notch codes.
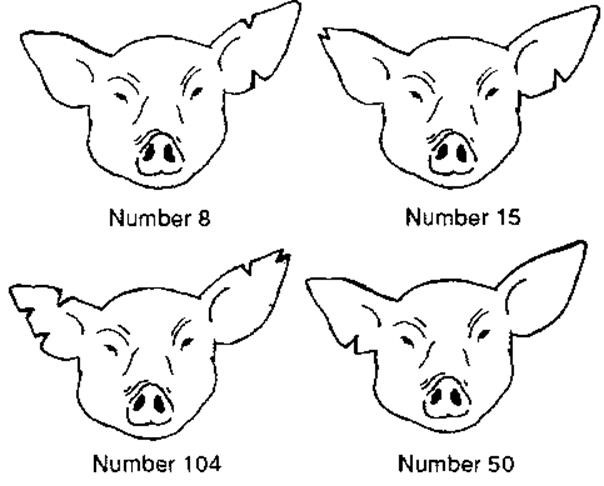
A mathematically interesting system of numbering based on in-ear notches is still being used in pigs (Official Berkshire Ear-Notching System). In this system (Figure 2), a smart combination of notches in the right ear (coded as numbers 1, 3, 9, 27 and 81) and in the left ear (coded as numbers 100, 200 and 600), are used for litter marking. Up to 1 199 litters can be marked with this coding system. The right ear is also used to add the individual marking of a pig inside a litter (coded as digits 1, 3 and 9).
Each pig in a litter will have the same notches in the right ear and different notches in the left ear. This method can be used to identify other animals, e.g. sheep and goats.
Notching the Ear
A V-shaped notch can be cut out of the edge of the ear using a pair of clean scissors. Make the notch a few centimetres deep so in future you will be able to read it from a distance.
The notches on the left ear are for single numbers and on the right ear, the notches are for tens.
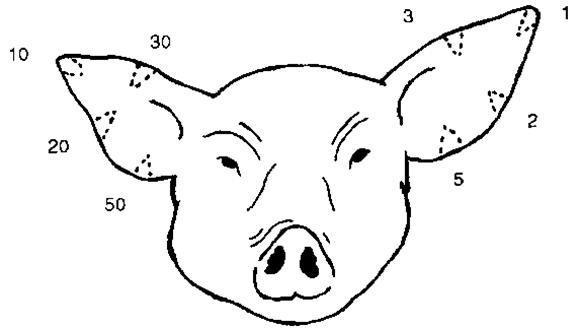
Recording the Number of the Pig
Look at the notches on the right and the left ears then add up the number on each ear to give the number of the animal.
Click here to view a video that explains animal identification.