Page
Perform Pre-Start Inspection
Completion requirements
View
Before starting up the irrigation system, a number of pre-start-up checks must be performed, being:
- Assessing water availability.
- Checking and cleaning the pump, filters and valves.
Assessing Water Availability
It is very important to ensure that there is enough water in the supply source, such as the river, canal, dam, pit, etc. before the pump is started. If there is not enough water in the water source the pump will suck air, which will cause cavitation, which is very destructive and can cause damage to the pump.
Cavitation is one of the greatest dangers to the pump. Cavitation can be caused by:
- The water level in the water source is too low.
- Water is lost through leakages in the suction pipe or one of its connections; or
- The filter in the inlet system is blocked or dirty.
- Defective valves that do not open properly.
All of these factors must be checked carefully as part of the pre-start-up procedure. Note that cavitation can also occur when the pump sucks air because of not being properly primed. Make sure the pump is primed properly.
Cavitation will only become evident once the pump is running when it will show symptoms such as loss of pressure, excess noise and vibration and the pump body becoming warm. If this occurs, the pump must be switched off immediately.
Make a visual inspection of the water level before starting the pump. The water level must be above the minimum water level mark, which should be marked by the irrigation manager. If the water level is near or below this mark, do not start the pump. If the water level is too low to start the pump, or if water levels fell below the minimum water level mark while the pump was running, report it to the irrigation manager or supervisor
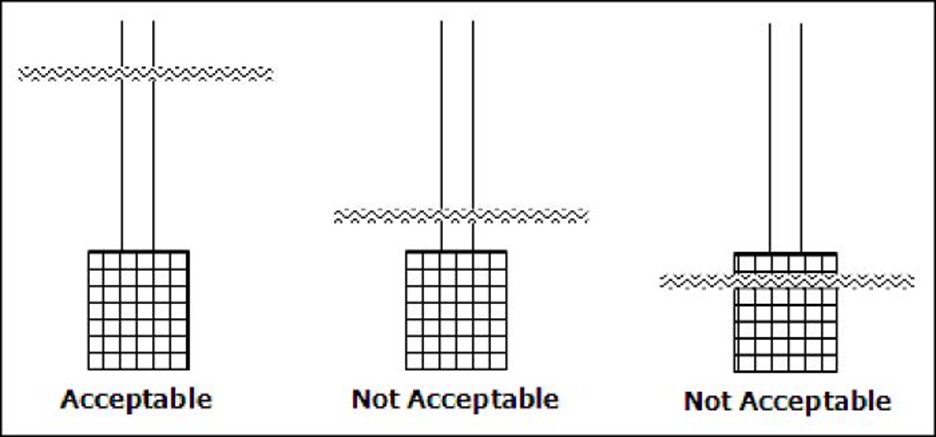
The Figure above gives an indication of what constitutes an acceptable water level. The picture in the middle is unacceptable because even though the water level is above the intake, the pump will suck air as soon as it is started and the water level drops.
If crops are irrigated from a borehole, a water level switch inside the borehole will prevent the pump from starting.
Checking and Cleaning Components
The various components of the irrigation system must be checked before the system is started. Never start the pump system to check that it is working properly, as damage may be caused to a component. A visual check of the various components is essential.
Pump
Pumps and motors run on bearings that need lubrication by either grease or oil. Failing to lubricate the pump and motor can result in serious damage.
Bearings that are lubricated by oil have a dipstick that indicates the oil level. Before the pump is started, remove the dipstick and check the oil level. The oil level should be between the minimum (Min) and maximum (Max) marks. If the oil level is above the Max or below the Min marks, report it immediately to the manager. In addition, visually check that the oil is clear. If the oil is milky, grey or black, report it immediately to the manager before starting the pump.
Where pumps and motors are fitted with grease nipples, the pump and motor must be greased regularly. Consult the manager for the intervals, as they vary between different makes of pumps and motors. Note however that some motors are fitted with sealed bearings that must not be greased.
Grease the bearing with a grease gun until the old grease is expelled from the casing. Clean the nipple before greasing and wipe off the old grease with a rag. Beware of over-greasing electrical motors, as the excess grease can end up inside the motor windings and cause the motor to burn out. Make sure grease is clean, free of grit and sand, and of the right type.
In addition, the following checks must be made before starting the pump:
- Check for excessive water inside the pump house. If excessive water is found, try to establish where the water is coming from.
- Check the oil levels.
- Inspect the pump for leaks at flanges and leaks on the pump body. Flanges are the metal discs on the pipes that are bolted down onto the pump. A gasket is inserted between the two flanges and leakage can occur if the gasket is worn or if the flanges are not properly tightened.
- Inspect the gland packing around the pump shaft. The gland packing is the seal at the pump shaft and seals the water inside the pump.
- Check the rubber coupling at the pump and motor shaft for signs of wear and cracks.
- Check for loose mounting bolts, which are used to attach the pump to the platform.
- Turn the pump with your hand to ensure that it rotates freely.
- Check that the motor is not wet.
- Check that the starter panel is not wet.
- Check for signs of vandalism, e.g. forced entry, missing cables, broken panels and mountings.
Filters
Filters are used to remove solids and other debris from irrigation water. There is a filter, called a suction filter in the suction pipe before the water enters the pump. There are also filters in the delivery pipe after the pump.
It is important to ensure that the filters are working properly, otherwise:
- Pump failure can occur due to blockage of the impeller. This will happen if the suction strainer is broken or missing;
- Pipes or emitters can be blocked by debris or other solids.
The suction strainer is underwater and can be checked only by removing it. This is done once a year or on instruction from the manager. At these times, inspect the strainer for damage and blockages, and clean if needed. Perform the following checks on the filters before starting up the pump system.
- Check the filter valves.
- Check that the filter lids are bolted or clamped down.
- Check the lid seal or rubber ring for cracks.
- Check flanges for leaks.
- If the filter is fitted with hydraulic valves, check the small inline filter and clean if necessary.
If the filters in the filter bank after the pump delivery are dirty, there will be a pressure loss in the field. This can only be assessed when the pump is running. Filter banks are cleaned by back-flushing them with the pump running.
Valves
For hydraulic valves check the following:
- Check to see if the 3-way valve can turn between open, close and auto, and return it to the original setting.
- Check the rest of the valve for damage to the tubing, fittings, solenoids and wires.
Other Components
The following should also be checked, preferably while the system is operating:
- Check those emitters are fully open and unblock if otherwise. Do not damage the emitter during unblocking.
- Check for leaks in the laterals and other pipelines and report immediately when found.
Reporting on the Pre-start-up Inspection
A pre-start-up checklist should be used to record the findings of the pre-start-up procedure.
When the pre-start-up checklist has been completed it is handed to the supervisor or manager and matters that require urgent attention are reported verbally to the supervisor.
Priming Pumps
Priming means filling the pump with water so that all air is expelled. If the pump is not primed, it will not be able to draw water from the water source, which will result in cavitation. If the pump is fully primed, it will be able to draw and pump water. Centrifugal pumps must be fully primed in order to work properly.
To check whether the pump is primed, open the cock valve on the delivery side of the pump. This is a small valve that is used to expel air and to check whether the pump is full of water. If water squirts from the valve, the pump is primed, but if no water is present, the pump still has to be primed.
There are various methods that can be used to prime a pump. To prime a pump that is below the water level, for example, a pump at the bottom of the dam wall, simply open the cock valve and keep it open until all the air has escaped and only water squirts out. Once the cock valve has been closed again, the pump is primed.

If the pump is above the water level, the pump can be primed using the funnel, the vacuum pump or the line pressure.
To Prime, the Pump Using the Funnel
- Ensure that the delivery valve is closed.
- Open the valve below the funnel.
- Pour water into the funnel using a bucket. The water goes into the pump and the air will be expelled through the funnel.
- Continue to fill the pump until the funnel is brimming with water and no more air is expelled.
- The pump is now primed and the valve below the funnel can be closed.
To prime the Pump using the Vacuum Pump
- Ensure that the delivery valve and all other valves are closed.
- Open the valve below the vacuum pump.
- Use the handle of the vacuum pump to pump all the air out.
- The pump is now primed and the valve below the vacuum pump can be closed.
- When the mainline is filled with water, the line pressure can be used to prime the pump. If a non-return valve is fitted at the delivery valve, the bypass valve as well as the cock valve must be opened. Air will blow from the cock valve. When water squirts from the cock valve, the pump is primed, and the cock and bypass valves can be closed.
In some instances, the pump won’t prime, which could be due to either a leak on the suction pipe or a faulty foot valve. Report such an incident immediately to the supervisor or manager.