Page
Physical Intake
Completion requirements
View
Click here to view a video that explains how grain intakes work.
When grain is received, it is drawn from the intake container onto the conveyer belt, from where it flows via ducts and valves to the bucket elevators, that move the grain upward into the top of the silo from where it again flows via ducts and valves to a pre-cleaning machine (optional) and an upper bin belt.
Receiving Grain at Silage Depot
When receiving grain at a depot with silo bags and bunkers the following aspects are important:
- Prepare a suitable terrain to place silo bags/bunker.
- Bunkers must be erected in line with the supplier specifications and requirements.
- Silo bags must be placed according to specification.
- Silo bags must be clean and waterproof.
- Take a representative sample.
- Grade the sample according to grading specifications.
- Allocate the consignment of grain to the correct silo bag or bunker according to the grade awarded.
- When silo bag is full, the bag must be sealed.
- Grain in a bunker must be sealed each day after the last consignment of grain was received.
- When a bunker is full it must be sealed according to specifications.
- Bunkers and silo bags must be inspected daily for tears, holes and defects.
Grain Sampling
A trained certified produce inspector should perform sampling and grading of grains.
- The correct and proper equipment for quality assessment must be available. For sampling the proper simple bag sampling spear (bag trier) or bulk sampling spear for bulk grain should be used.
- Primary samples are drawn from all parts of the consignment at random, with all parts of the consignment having equal opportunity of being sampled. Ensure samples are drawn from as many parts as possible – from lateral sides and top. The sample must be representative of the consignment.
- The sample must be received in a plastic bag properly labelled with identification including date, agent/farmers/supplier name, product, vehicle/truck number.

Grain Grading
The purpose of assessing quality of the grain is to properly identify the grain and its homogeneity with respect to its intrinsic and acquired characteristics. The Set of Screens, Weighing scale and Grain Moisture Analyzer II result of the assessment presented as a Quality Analysis Report, can be used to grade the grain, determine the price, and evaluate the suitability for storage, conservation or for other planning purposes.
Quality assessment of grain is based on some of the following physical, chemical or biological parameters which can be used to define grain – size, shape, colour, density, moisture content, hardness, structure, bio-chemical composition (protein, fat, carbohydrates content, mineral anyhow) and nutritive value. Some of these parameters are used for assessment of quality of grain for specific end use application – e.g. in bread baking, seed, beer produce, vegetable and production.
However, for the general commercial transaction and storage, the parameters commonly used are those that influence price, storability and healthy/safety. These include moisture content, density, broken grain, infestation, foreign matter, heat damage, mould damage and discoloration.
The Produce Inspector/Grain Grader analyses the sample for all the stipulated parameters and presents the result on the grading sheet called Grain Analysis Result Sheet. He also maintains the result in a black book register as permanent record.
Weighing the Grain
Trucks with consignments of acceptable quality grains are directed to the weighbridge for weighing. It is important that the correct quantity of grain delivered is established since weight is the basis for payment of the grain. This is accomplished by the weighing clerk carefully weighing the gross weight and the tare weight of the truck and computing the difference.
The weighbridge clerk raises a weighbridge ticket. He also maintains a register where he keeps a record of the salient information of the transaction such as date, truck number, crop, gross weight, tare weight, net weight, Grain Analysis sheet number.
Receiving the Grain
Grain is received in bulk mostly in trucks or by rail. Often, but not always, the grain is transported by trucks with bottom discharge outlets.
At the reception pit/hopper, the plant operator peruses the delivery document to ascertain the nature of the consignment and prepares the appropriate silo route to a designated bin to receive and store the grain.
Cleaning the Grain
As the grain is offloaded into the reception pit, it is conveyed to the cleaner. Cleaning grain makes storage and handling easier. Insects attack broken kernels and grain dust quickly than grains. Again, heat and moisture caused by the respiratory activity of grain cannot escape quickly from piles of unclean grain thus creating condition favourable for mould and fungal growth.
All chaff, dust and other foreign materials recovered at the cleaner and reception pit, any reject grain, empty bags due to the consignment are loaded back to the truck. The truck proceeds to the weighbridge for weighing tare weight and documentation for the delivery completed.
As the cleaned grain is conveyed, a suitable approved insecticide or fumigant is added into the grain stream at the recommended rate. The grain is moved into a designated bin for storage. The plant operator updates the respective bin card and the grain fumigation forms.
Receiving Procedure for a Bunker Depot
When the bunker is ready for receiving the grain product, position the DOH/Stacker at the point where the hexagon end meets the long side of the bunker wall. Once the stacker is in the correct location, check that the nozzle of the stacker is positioned exactly at the center of the bunker pad. Take note of how far the wheels are away from the bunker wall so this can be achieved every time you shift. Once the first load has been received, using a front-end loader, push the grain around the plastic to hold the plastic down so weights can be removed. Once enough grain has been spread, continue building the heap in the middle of the bunker. Once the grain heap starts to reach the top of the bunker wall, start trimming the heap by adjusting the stacker nozzle. This can be assisted by using hand scrapers to fill the gaps.
When filling using the Stacker, the grain heap should be left down approximately 150mm to 200mm from the top of the bunker walls to avoid overfilling. To add finishing touches, use scrapers to fill any depression so that the grain is left within 50mm from the top of the wall.
Once the heap gets to this stage, it is time to shift the DOH stacker.
Underfill is when the bunker is not filled to capacity; this causes water to pond in the hollows and can be a source of water ingress.
Overfill is created when the bunker is filled over its capacity causing spillage. When the bunker is tarped grain spills over the side causing a “sausage effect”. This causes a mess when boards are taken off to tighten tarps or when fumigating.
Ensure that the nozzle of the stacker throw the grain close to the existing peak of the grain heap, this will minimize shovelling and peaks and troughs along the ridge of the grain heap.
The tops of the bunker must be kept as level as possible as this will ensure tarps are tensioned square.
Click here to view a video that explains the loading of a bunker.

Completing a Bunker
If there is enough to totally fill the bunker, then the half hexagon end fill as per the rest of the heap.
If there is not enough grain to fill the half hexagon bulkhead, the tarp will be left draped down on the ground. To get the best seal when doing this, firstly pull the ground plastic up the heap approximately 4m. Then pull the tarp over the top and down to ground. Place weights on the tarps and clamp steel box sections on A-frames. Steel box sections rolled up underneath the leading edge of the tarp and the bunker clamps placed over the top and pinned to the pad using the bunker pins. This will help create a better seal for the fumigation purposes. Weights are also placed on the tarp to ensure security.
Tarp Operation
When handling bunker tarps be sure to understand the risks of doing so.
Tarps cover a large area and can act like a huge sail at times to catch wind and create a huge risk to all employees involved if safety protocols are not followed. Assess all of these risks and identify any safer options that could be put in place to proceed with the task if urgency is required. Always place the tarp clamps on the tarp securely so they do not slide off and injure the operator. Tarps can get very hot in the summer-time, so be sure to take care when handling. Use gloves and be aware of friction burns. If a situation starts to become out of control or unsafe, due to wind conditions when handling tarps, let the tarp go, and evacuate to a safe area.
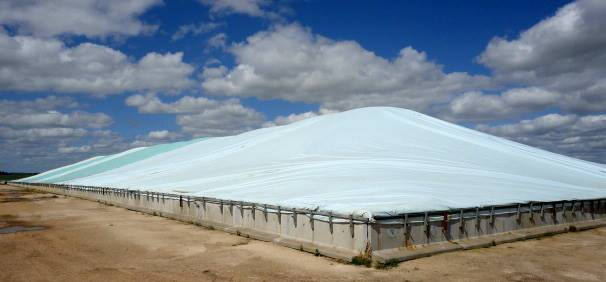
Grain Bunker Tarp
Once the head of the bunker is filled, tarping can begin. Two tarps are unrolled and sewn together on the ground, folded correctly, and one edge temporarily fixed to the wall. Once the tarps are sewn together, they are then pulled over the grain mass, so another tarp can then be sewn on to start the continual sewing, pulling process. Be sure to involve as many as many employees as possible so the task is made easier on all, and to minimize manual handling injuries.
This task can be made more difficult if the wind is traveling on the same direction as the tarp is being pulled, the wind will cause the tarp to hug the grain mass and cause friction. A slight breeze blowing against the tarp direction will aid the process by bellowing the tarp out causing it to lift itself from the grain surface slightly and make it easier to manage.
Once the tarp is at the top of the heap, the steel box section can then be placed on the walls and clamped to secure the tarp. Make sure the tarp is square and even on the grain mass. It may be necessary to place a crease in the clamped in place, a strap can be placed across the heap to stop the tarp from slipping down the heap. Another tarp can be rolled over the heap to be sewn onto the existing tarp. Note: Sew the tarps on so they have the seams down.
The importance of having no wrinkles or creases in the sewn seam cannot be underestimated. Creases or wrinkles effect the seal of the bunker as well as catch water moving down the tarp. Also make it difficult to obtain an effective seal on the seam.
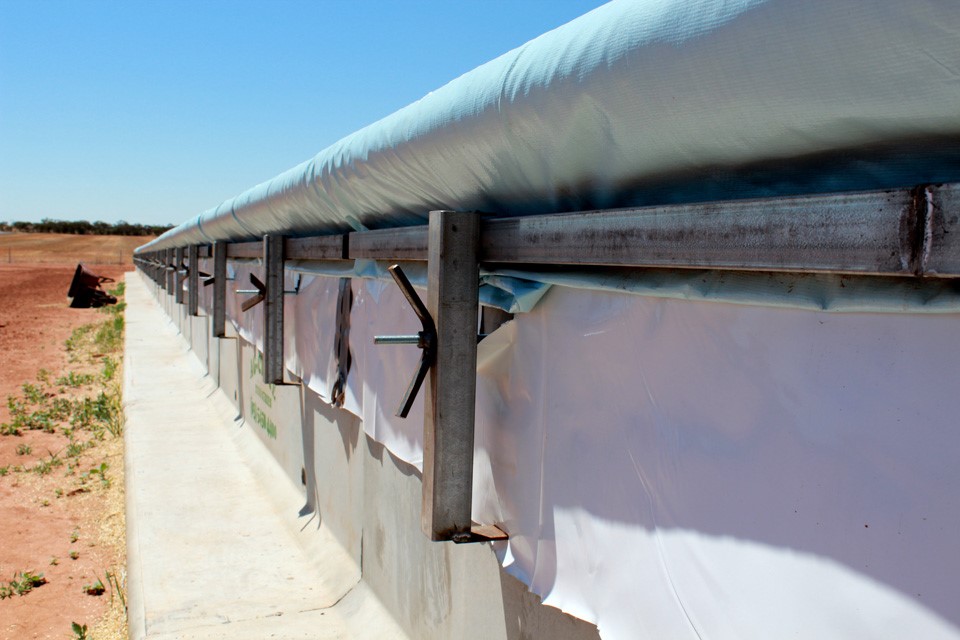
The third tarp can now be run over the grain heap. The new tarp is run over the bunker on top of the existing tarp. Machinery may be used to aid this part of the operation. Make sure that both ends of the tarp are left hanging over each side of the bunker walls evenly. The edges of the tarps can now be gathered and sewn together. When pulling the tarp, place employees evenly across the leading edge. A tarp puller is then firmly clamped to the tarp by each employee. Acting under the supervisor’s instructions, all employees pull the tarp together along or down the bunker until it is tight. Place the steel box sections and clamps on the walls to secure the tarp. Continue this operation for all subsequent tarps.